To operate, CyberChamber requires the Costs Assessor to upload Costs Data to our platform as a CSV file. The significant advantage for the preparer and the parties involved in providing the Costs Data in a CSV file is a faster, cheaper, and more efficient Costs Assessment.
It’s not. In fact, it’s dead easy.
Instead of saving an Excel spreadsheet containing Costs Data (such as a Costs Statement, Itemised Bill, Schedule of Costs, etc.) with the “.xlsx” extension, you simply save it with a “.csv” extension.
Here is a video to show you what we mean.
CSV files are very common.
Examples include Xero Accounting (which we use). Xero provides a facility to upload or import bank statements as CSV files (see here). MYOB also provides a similar facility (see here).
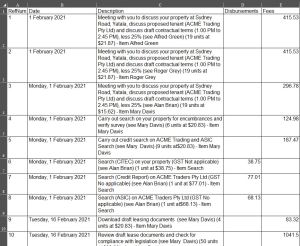
A typical Costs Statement, Itemised Bill, or Costs Schedule, or similar Costs Claim Document, will require five columns of Cost Data. They are:
- Reference Number (a unique identifier for each Costs Item)
- Date (the date that the Costs Item was incurred)
- Description (a description of the Costs Item)
- Disbursement (a monetary amount if the Costs Item relates to the payment of a Disbursement
- Fees (a monetary amount if the Costs Item relates to the performance of legal work)
These five requirements are reflected in a standard Costs Statement in UCPR Form 60A, as shown on the last page of the following PDF version of Form 60A.
Preparers will be very familiar with UCPR Form 60A.
We provide a template for Costs Data CSV files here.
To prepare a Costs Data CSV File, follow these steps:
- Prepare the Costs Data for your Costs Statement, Itemised Bill, Schedule of Costs (or other Costs Claim document) in accordance with your usual practice in a spreadsheet. This spreadsheet might be in Microsoft Excel, Word, or an Apple or Linux-based application. Costs Items are typically recorded in chronological order, with corresponding reference numbers in chronological order.
- Ensure that the columns in your spreadsheet align with the columns in our CSV template (that is, Reference Number, Date, Description, Disbursement, or Fee).
- This first line of column headings must remain in the CSV file. This is because CyberChamber will disregard the first line in any CSV file that is uploaded to our platform.
- Download our Costs Data CSV file template from here.
- Either copy your Costs Data into our CSV template and save it or copy the first line of our CSV template (containing the five headings) to your spreadsheet and save your spreadsheet as a CSV file.
- Validate the CSV file.
The validation process ensures that our platform will accept your CSV file in the form that will enable the Assessor to process the Costs Data without any problems or hitches.
The Validation process is as follows.
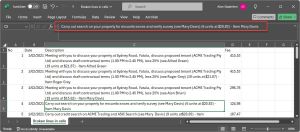
1. Remove line breaks within single Description cells
Within a single Description cell, the text should be in one continuous thread.
Here is an example:
However, it is quite common when copying text (especially from a PDF) and pasting it into a spreadsheet for the continuous thread to break. Instead of having one continuous thread, the text breaks and automatically formats itself over multiple lines within the same cell.
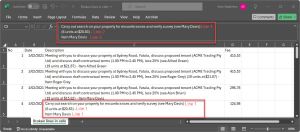
Here is the same example, but showing typical breaks in the thread, which now occupies three lines in the cell:
This example is quite obvious. However, line breaks are frequently not obvious. Furthermore, some Cost Data Files may have thousands of lines.
To help with this, we provide the following method to remove bulk line breaks with a single Find and Replace operation.
To remove all broken lines within single cells, in your CSV File, follow these steps:
- Simultaneously press the Control and F keys, which will open the Find window.
- In the Find window, open the Replace field.
- In the Find window, simultaneously press the Control and J keys. This will insert a flashing period (i.e., a full stop) in the Find window.
- Click the “Replace All” button.
- Excel will show you the number of broken lines it removed, which Excel describes as “Replacements.”
Here is a short video to show you what we mean.
2. Remove line breaks across multiple Description cells
Within a single Description cell, the text should be in one continuous thread.
Here is an example:
However, it is quite common when copying text (especially from a PDF) and pasting it into a spreadsheet for the continuous thread in the Description cell to break. Instead of having one continuous thread, the text breaks and automatically formats itself into the next lower Description cell (sometimes called a “carriage return”).
The broken text in the second Description cell is ‘orphaned’ from the associated Reference Number and Date. This means that there is no Reference Number and/or Date for the broken text.
Here is the same example, but showing typical breaks in the Description thread, which now occupy two cells. Both the Reference Number and the Date cells for the broken text in Cells C:3 are empty:
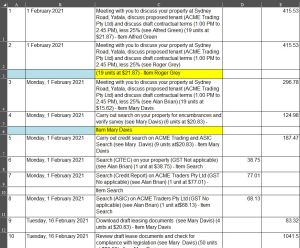
The problem is that a Reference Number and Date for each Description cell is mandatory. If there is no Reference Number and Date for each Description cell, the CSV file is not valid. Therefore, the Assessor will be unable to upload the file.
This example is quite obvious. However, multi-cell line breaks are frequently not obvious. Furthermore, some Cost Data Files may have thousands of lines.
To help with this, we provide the following method to find orphaned text that has broken and dropped down from the original Description text.
To find and fix broken text and orphaned text in your CSV file, follow these steps:
- Select Column A, which is the Date column.
- Press the “F5” key (usually at the top of your keyboard).
- Click the “Special…” button.
- Select “Blanks”.
- Press “OK”.
- Excel highlights all empty cells in the Reference Number column.
- For each empty cell, go to the broken text in the Description column (Column C).
- Cut that broken text and paste it back into the cell immediately above (which contains the original text).
- Now delete the blank line.
- Repeat this process for any other empty Reference Number cells.
- For completeness, check the Date column (Column B) for empty cells by selecting Column B and pressing the “F5” key. If there are any empty cells (although this would be unlikely), repeat the above cut, paste, and delete steps.
If you are unable to find or use the F5 key, use the “Find & Select” feature:
- To use this feature, select the column you wish to check (start with the Reference Number column).
- Go to the top menu and click on “Find & Select”.
- Scroll down to “Go To Special”.
- From the mini panel, select “Blanks”.
- Excel highlights all empty cells in the column.
- Repeat the above cut, paste, and delete steps.
Here is a short video to show you what we mean.
3. Ensure numerical amounts are in plain text
The numerical amounts for professional fees and disbursements should be in ‘plain text’ only, with numbers and a decimal point for cents only.
These amounts should not be in a ‘currency’ or ‘accounting’ format.
Recording professional fees and disbursements in either the ‘currency’ or ‘accounting’ format (using dollar signs ($) or commas for thousands, hundreds of thousands, and millions, etc.) will invalidate the CSV file, and the assessor will be unable to upload the Costs Data CSV file.
To convert amounts for professional fees and disbursements from a ‘currency’ or ‘accounting’ format to a ‘plain text’ format, follow these steps:
- In your spreadsheet, select the professional fees and disbursements columns.
- Go to the top menu in Excel, and go to the Number panel.
- From the dropdown list, select Text.
Excel will automatically convert the ‘currency’ or ‘accounting’ format to a plain text format. All dollar signs and commas after every third figure will disappear.
Here is a short video to show you how.
4. Ensure dates are in “short form”, not “long form”
A ‘long form’ date includes names, which are weekday names and/or names of the month (for example, “Thursday, 29 August 2024”).
CSV files require short dates, which are expressed as numbers and forward slashes only, in the recognised Australian format of DD/MM/YYYY.
Therefore, you will need to ensure that all dates comply with this format (for example, “29/08/2024”).
If you need to convert bulk dates to short-form dates, we have prepared some easy steps below.
However, these steps will only work where the long form date appears in the formula bar in ‘date’ form, or in the formula bar in plain ‘text’ form where the date includes a named month. If the date in the formula bar is in plain text and includes a named day and a named month, the following bulk conversion steps will not work.
This is what we mean:
In this spreadsheet, the long form dates in each cell are recorded as DD/MM/YYYY in the formula bar:
In this spreadsheet, the long form (with named month only) dates in each cell are recorded as plain text in the formula bar:
In this spreadsheet, the long form (with named month and named day) dates in each cell are recorded as plain text in the formula bar:
In summary, the following simple steps will convert bulk long-form dates to short form, provided the long form date is not in plain text with both the named weekday and the named month. For the latter category, we were unable to find any simple conversion method. We can only suggest removing the named weekday from each date and using the following steps.
Simple Long Form
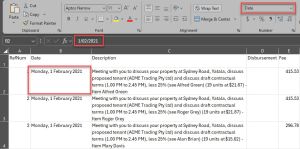
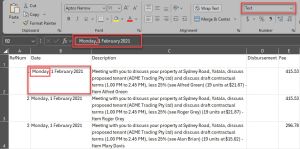
- In your spreadsheet, select the Date column. In this example, the Date column is column “B”. We click on cell B:2, which says “Monday, 1 February 2021”. In the Formula Bar, at the top, we see a short date, being “1/02/2021”.
- Having selected the Date column (i.e., column B), go to the top menu in Excel, and go to the Number panel.
- From the dropdown list, select Short Date. Excel will automatically convert all the long dates in column B to short dates.
Here is a video of these steps.
Plain Text Long Form
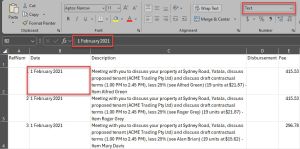
- If you have copied text from an external document (for example, a GST invoice), the long dates may appear in the formula bar as plain text. In this example, in another worksheet, we click on cell B:2 and we see that the long date appears in the formula bar as “1 February 2021”.
- Selecting the date column and attempting to convert these plain text dates to short dates using the dropdown in the Number panel does not work.
- Therefore, we insert a new column between the Reference number column (Column A) and the date column (Column B). The new column is the original Column B, and the date column becomes Column C.
- Cell C:2 reads “1 February 2021”.
- In cell B:2, type “=DATEVALUE(C:2)”.
- In cell B:2, the numbers 44228 appear. Excel can read this code as a short date.
- Go to the Number panel and select Short Date from the dropdown list.
- Excel reads 44228 as 1 February 2021.
- Copy cell B:2 (i.e., 1/02/2021) and paste the formula into all the remaining Column B cells. Excel converts the remaining dates to short form dates.
- Make sure that the word “Date” is in the first line for Column B.
- The last step should be to delete Column C, with the original long form dates. However, because the formula in Column B depends on the long form dates in Column C, deleting Column C would invalidate all the new short form dates.
- Copy all the new short form dates, open Notepad (or a similar simple text app), and paste the new short form dates. These dates are now independent of the original dates in Column C.
- Copy all the dates in Notepad and paste them back into Column B. Now you can delete Column C.
Here is a short video of these steps in action.
5. Remove any HTML scripts (“short HTML scripts”) from your Costs Data
HTML included in the CSV may invalidate the CSV and prevent it from uploading. HTML is comprised of the ordinary alphabet, numerals, and some of the standard characters in a recognised order or sequence, which normally generates the content of websites.
However, short HTML scripts can accidentally occur when one type of data is converted to another type of data. Here are some examples of short HTML scripts:
& (ampersand) becomes & in HTML
“ (double quote) becomes " in HTML
‘ (single quote) becomes ' in HTML
< (less than) becomes < in HTML
> (greater than) becomes > in HTML
Generally speaking, a search for ampersands (“&”) will find short HTML.
This is not to say that you cannot use an ampersand by itself in your Costs Data. The problem occurs when the ampersand is not used by itself but immediately precedes and is joined to other characters, which create a short HTML script.
6. Ensure that the first line of the CSV does not contain any Costs Information
As stated above, the first line of the Costs Data CSV file must only contain the five column headers:
Reference Number | Date | Description | Disbursement | Fees
When you have validated your Costs Data CSV File, deliver it to the Assessor. Delivery might be by email, Dropbox link, or USB. The Assessor should inform you how they wish to receive the Costs Data CSV File.
The key point is that the Assessor is responsible for uploading the Costs Data CSV File to our platform. It is not your responsibility to do so.
Therefore, we have not provided any technical ability for Preparers to upload Costs Data CSV Files to our platform.
Quotation marks and speech marks in CSV files
You might be aware that in CSV files, Excel automatically adds quotation marks (i.e., “”) to text that contains commas (,). This is because (by definition), CSV (Comma Separated Value) files are separated by… commas. This means that raw text containing commas will separate at the comma.
To prevent text from separating at commas, Excel encloses text (containing commas) with quotation marks.
Here is a screenshot of a Costs Data CSV file in Excel.

Here is a screenshot of the same file that is open in Notepad. It shows the commas (in green boxes) and the quotation marks (in red circles) that Excel added to prevent text from separating at the commas.

You might be tempted to remove these quotation marks using Notepad (using Find and Replace).
Here is a screenshot of the same file in Notepad after removing the quotation marks.

However, when the same file is opened in Excel (after the quotation marks were removed), Costs Data has separated at the commas and is now ‘all over the place’.

In summary, you should not remove quotation marks that Excel has inserted into a Cost Data CSV file.
